Automating ESXi Deployments with Vagrant: Streamlining Your Infrastructure
KACEY
Vagrant and ESXi Integration - Automating VM Deployments Like a Pro
In the world of IT infrastructure management, automation is a crucial tool for efficiency and consistency. One powerful combination for achieving this automation is using Vagrant alongside VMware ESXi, a leading hypervisor. In this guide, I will walk you through the process of automating your ESXi deployments with Vagrant, making your virtualization setup a breeze.
In the world of IT infrastructure management, two popular tools, Vagrant and Terraform, serve distinct purposes. Let's dive into their core differences and when to use each one.
Use Case: Vagrant is your go-to tool when you need to create and manage development environments on your local machine.
Ideal For: It's perfect for web developers, testers, and those who want to replicate production environments for development and learning purposes.
Key Benefit: Vagrant excels at quickly setting up isolated, customizable development environments that mimic production settings.
Use Case: Terraform is the tool of choice for defining and provisioning infrastructure as code.
Ideal For: It shines in cloud, multi-cloud, and production environments, making it a reliable choice for scaling applications, managing cloud resources, and automating CI/CD pipelines.
Key Benefit: Terraform automates the deployment and scaling of complex infrastructure components, making it suitable for real-world, production-grade deployments.
Vagrant is your companion for local development and smaller-scale setups. Terraform is the master of infrastructure as code, built for managing production-ready, scalable, and complex environments.
Feel free to use either Git bash or PowerShell as administator rights for this tutorial, in this example i'm using Git bash.
Once you have opened up either Git bash / PowerShell please follow along.
Before we dive into the setup, ensure you have the following software installed:
- VMware ESXi 6.5+ (for this exercise, we'll be using VMware ESXi 8).
- VMware Workstation 16+ (or VMware Workstation 17).
- VMware OVF Tool: Download and install a compatible version (e.g., VMware OVF Tool 4.5.0 and above) from VMware's developer site.
- Vagrant: You can easily install Vagrant through Chocolatey by running
choco install vagrant Next, let's ensure Vagrant is equipped with the necessary plugins:
vagrant plugin install vagrant-vmware-esxi
vagrant plugin install vagrant-winrm-syncedfolders
vagrant plugin install vagrant-reload
You can verify the installed plugins with
vagrant plugin list Vagrant uses virtual machine images, known as "boxes," to create and configure VMs. For our tutorial, we'll use a Windows Server 2016 box from Vagrant Cloud. Let's add this box:
vagrant box add StefanScherer/windows_2016Make sure you've installed VMware OVF Tool and added its path to your environment variables. You can verify the installation with:
ovftool.exe --help- Create a directory where you want to initialize your Vagrant box. For example,
D:\vagrantvms\ESXI\windowsserver2016 - Inside this directory, run
vagrant initto create a Vagrantfile.
-
Open the Vagrantfile in your preferred code editor (e.g., VSCode).
-
Replace the contents of the Vagrantfile with the following code:
Vagrant.configure('2') do |config|
  config.vm.synced_folder ".", "/vagrant", disabled: true
  config.vm.define "WEB01" do |config|
    config.vm.box = "StefanScherer/windows_2016"
    config.vm.hostname = "WEB01"
    config.vm.guest = :windows
    config.vm.communicator = "winrm"
    config.vm.boot_timeout = 100
    config.vm.graceful_halt_timeout = 100
    config.winrm.timeout = 120
    config.winrm.username = "Administrator"
    config.winrm.password = "PASSWORD"
    config.winrm.transport = :plaintext
    config.winrm.basic_auth_only = true
    config.vm.provision "shell", inline: "Rename-Computer -NewName WEB01"
    config.vm.provision :reload

    config.vm.provider :vmware_esxi do |esxi|
      esxi.esxi_hostname = "IP address of ESXi"
      esxi.esxi_username = "root"
      esxi.esxi_password = "Your password"
      esxi.guest_memsize = "2048"
      esxi.guest_numvcpus = "2"
    end
  end
endNow, let's break down some key parts of the configuration to help you understand how it works:
-
config.vm.box: Specifies the box to use (in this case, Windows Server 2016).
-
config.vm.hostname: Sets the hostname of the VM.
-
config.winrm.username and config.winrm.password : Configures the local administrator account.
-
config.vm.provider :vmware_esxi Defines ESXi-specific settings like hostname, username, and resources allocated to the VM.
-
config.vm.provider :vmware_esxi do |esxi|: This line indicates that you are configuring VMware ESXi as the provider for this Vagrant VM. It opens a block where you define specific settings for the ESXi provider.
-
esxi.esxi_hostname: Here, you should replace "IP address of ESXi" with the actual IP address or hostname of your VMware ESXi server. This is the address Vagrant will use to connect to your ESXi host and deploy the VM.
-
esxi.esxi_username: Replace "root" with the username you use to log in to your ESXi host. This is the username Vagrant will use to authenticate and interact with the ESXi server.
-
esxi.esxi_password: Replace "Your password" with the actual password for the ESXi host's username provided above. This is the password Vagrant will use for authentication.
-
esxi.guest_memsize: This parameter specifies the amount of memory (RAM) allocated to the virtual machine in megabytes (MB). In this example, "2048" MB is allocated, which corresponds to 2 gigabytes (GB) of RAM. You can adjust this value based on your VM's requirements.
-
esxi.guest_numvcpus: This parameter determines the number of virtual CPUs (vCPUs) allocated to the virtual machine. In this example, "2" vCPUs are assigned. You can modify this value depending on the performance needs of your VM.
Save the Vagrantfile, navigate to the directory containing it, and run:
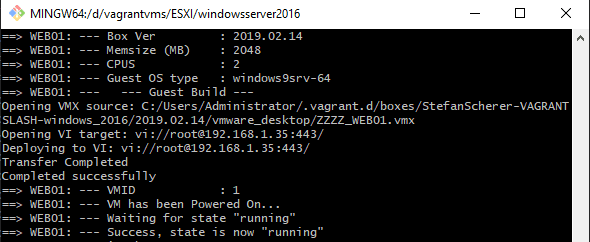
vagrant upIf everything is configured correctly, you should see your VM deployed, set up, and ready to go. The automation process saves you time and ensures consistency in your virtualized infrastructure.


For more examples and detailed documentation, you can explore the official GitHub repository.
This setup is easily adaptable for multi-VM environments. Simply duplicate the VM configuration block within the Vagrantfile, customize the settings as needed, and give each VM a unique name and IP address. With one command, you can quickly set up an entire environment.
By combining the power of Vagrant and VMware ESXi, you can streamline and automate your VM deployments. This not only saves you time but also ensures that your virtualized infrastructure is set up consistently and efficiently. Explore more possibilities with automation and take control of your IT environment.